Clip Art Studeio How Do I Get Expression Color
Some artists similar to make a filigree in Clip Studio Paint to better organize their composition. After thumbnailing for a bit and choosing a final sketch, it feels expert to have a grid, so nosotros tin boom everything downwardly as we want!
Information technology is especially useful to take an Isometric Filigree if you're using perspective. This ane is a bit harder to tackle in Clip Studio, but at that place are notwithstanding solutions for it!
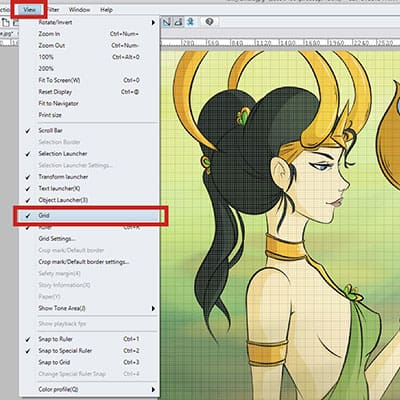
How to make a grid in Clip Studio Paint? Go to 'View -> Grid'. A grid should appear right away on your sheet.
This is the curt answer on how to open up a filigree. You tin actually customize this grid every bit you lot similar and need. Also, I mentioned y'all can find an easy solution to have isometric grids on Clip Studio, and so keep reading!
Making A Filigree In Clip Studio Pigment
A lot of people like to piece of work with grids and so that everything is well organized. It tin be really useful if you lot're doing a very big work with a lot of objects and details. For example, it is besides useful if yous're practicing from paintings and drawing a representation of it!
This is a very common exercise when studying art and how to depict. I call back doing this in high schoolhouse, except it was with traditional art. Only, information technology is very possible and even simpler to practice digitally!
Accept ii opened documents, so choose a painting y'all like and want to copy. The other document should have the aforementioned size and be blank right side by side to the one with a film of the painting.
Now you take to put up a grid! To practise then, go to 'View -> Grid'. A very detailed grid should cover the entirety of your document now.
Practise this with both documents. The idea is to use the filigree so y'all can look at the painting, pinpoint the location of each detail or object and replicate it on your drawing, in the right places! This is a very skilful exercise and I really recommend to practice and then, even if it'southward only for fun. Replicating paintings can help yous have a better agreement of color, composition, and rest.
Fifty-fifty though information technology is non immediately clear in Prune Studio, you can really edit and modify the grid to something y'all prefer!
Editing Your Grid
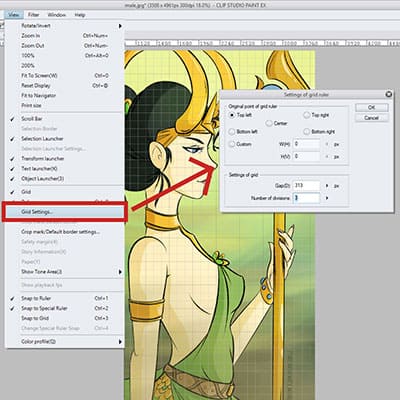
The grid that appears when enabling information technology is very detailed. This might be something yous don't need or desire. Fret not, because you tin can alter information technology to something more comfortable! To edit the Filigree in Clip Studio Paint, go to 'View -> Filigree Settings…'. This will open a small-scale window with some options.
Original Signal Of Grid Ruler
The beginning set of options you take is the 'Original point of the ruler'. Here, yous tin cull from where volition your filigree exist changed and edited. Yous tin choose its original point from the:
- Acme Left
- Elevation Correct
- Center
- Bottom Left
- Bottom Right
Choose the one you want based on your needs! If none of these are good for what yous want, there'due south even a 'Custom' option! Simply cull it and enter the exact point where you want the Original betoken of the ruler to be.
Settings Of Filigree
This is the fun role! You tin customize and gear up how big will the gaps in the grid be, every bit well and how many divisions you lot want! There are two options under the "Settings of Grid" box in clip studio pigment:
- Gap: You tin either enter a number or movement the bar upwardly and down, depending if you want bigger or smaller squares in your grid. For case, if you're doing the practice mentioned above, having bigger squares tin be more helpful! Or else, information technology can become besides confusing!
- Number Of Divisions: Notice that the grid appears to be divided by squares, that have smaller squares inside of them. By moving the bar upward, more squares will appear within each gap/square. This volition make the filigree fifty-fifty more detailed. By entering a smaller number, fewer divisions will be shown. You can even prepare information technology so none of them are showing.
How To Make An Isometric Grid In Clip Studio Paint
Unfortunately, there are no Isometric Grids bachelor on Prune Studio Pigment. You can do them by hand. Drawing lines over lines and so copying and pasting until you lot have a grid big enough. Doing this on Clip Studio isn't the all-time either, because you can't be 100% sure the lines are measured perfectly.
There are some options to solve this though. You can brand a filigree in other software, relieve information technology as a .png with transparent groundwork and utilise that filigree for whenever you need it! Yous tin can expect up something on the internet, save it on your pc and use it.
Simply there'south an fifty-fifty better way! Utilize the Prune Studio Nugget app or website. Prune Studio users can make materials and upload them into this app for other users to use. You just demand to create an business relationship and download the materials you lot need!
Some of these are paid, but you can detect a lot of useful tools for costless too! If you need an Isometric Filigree, yous tin download this i, made by rcbirdy. Simply log in or create a new account and hit the download button.
This filigree is very helpful and well made! You tin even resize information technology and rotate it without losing whatever quality nor make it look foreign or distorted.
To find your new Isometric Filigree on Clip Studio Paint just become to the Materials Tab and open the 'Download' binder. The grid should exist at that place now and you just need to drag it to the canvas to use it.
Related Questions
How do I brand a 5-point perspective grid In Clip Studio Paint? Both five-bespeak perspective and 4-point perspective aren't quite easy to do in clip studio paint using the base resource. I recommend you to grab a premade grid online (merely google 5-point perspective filigree for example), import it into Clip Studio Paint and work from there! Much simpler and faster.
Can I perspective warp in Clip Studio Paint? There's no actual tool to perspective warp in Clip Studio. All the same, information technology is doable! Press 'Ctrl+T' in your keyboard to enter in Gratis Transform fashion. If you lot printing 'Ctrl' while hovering the mouse over the points effectually the image, a small white pointer will appear. As long as this arrow is showing, you tin can perspective warp your image as you wish!
Back to the Blog
Source: https://doncorgi.com/blog/make-a-grid-in-clip-studio-paint/
0 Response to "Clip Art Studeio How Do I Get Expression Color"
Postar um comentário